
Why build a second brain?
I’ve been maintaining a personal notes system for most of my life on Evernote. The idea was to capture the useful things I came across so I could find them again when I need them. Whenever I’m stuck on a work negotiation, or looking for inspiration for a blog post, I want to be able to pull up the relevant wisdom I’d accumulated over the years.
Like most people, my biggest problem was retrieval. Most of what I captured just sat there. I’d search for a topic, get 40 results, spend ten minutes scrolling through half of them, find nothing directly useful, and give up. The notes were there, but it was just too tedious to sift through them to extract anything useful.
How AI solves the retrieval problem
Last week I wrote about how Andrej Karpathy’s idea changed this. Instead of organising notes yourself and hoping to find them later, you feed your raw material – articles, highlights, book passages – to an AI and let it build and maintain a set of customised wikis across all your accumulated knowledge. The AI reads your sources, synthesises the key ideas, creates pages for concepts and people, and keeps everything cross-referenced over time.
When I ran my first query on the completed system, it surfaced connections I’d never made myself: Catholic liturgy linked to behavioural economics, Paul Graham’s writing on focused thinking paired with a 400-year-old Jesuit practice.
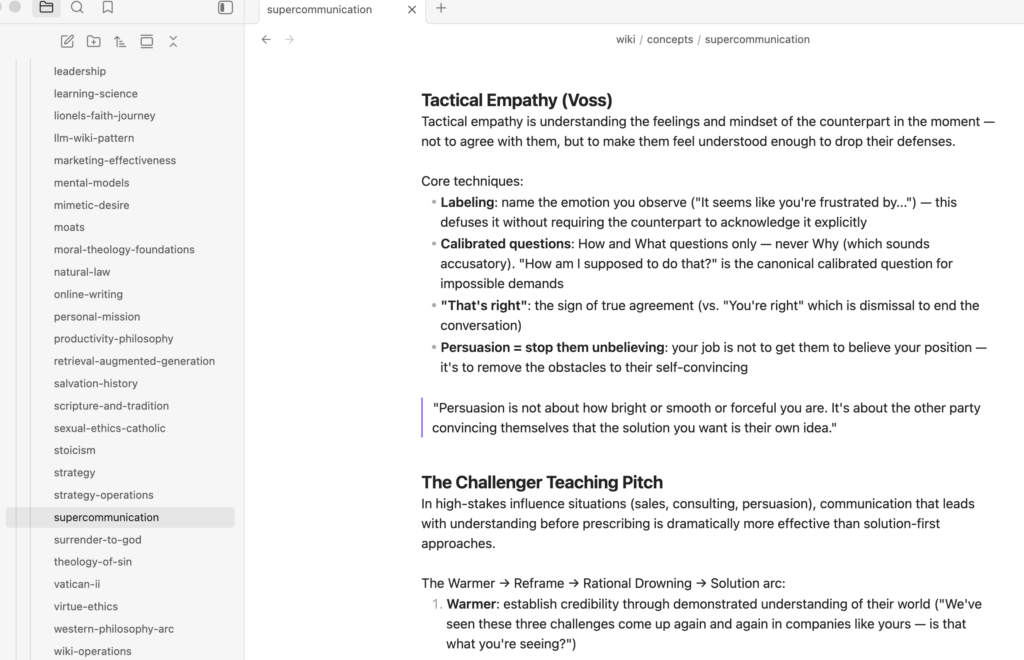
It also groups all my ideas from different places into broader concepts. Under my “supercommunication” wiki, it grouped several similar examples like Chris Voss’s tactical empathy and The Challenger Sale pitch:
What I also love about this system is that it’s self-maintaining. Whenever I drop in a new article or PDF, Claude ingests it and simultaneously updates up to 15 different wiki pages if the content touches that many concepts. This is super helpful especially when I come across a dense report with ideas that span multiple concepts.
After last week’s article, some folks reached out asking how I built my second brain, so here’s how I did it:
What you’ll need: Claude Code
The engine of the whole setup is Claude Code, which comes with a Claude Pro or Claude Max subscription. You don’t need to use Claude Code; any agentic tool like OpenAI’s Codex or Gemini CLI works as well, as long as it can read and write files on your local drive. However, I chose Claude Code because it’s what most users seem to be using.
The name “Claude Code” sounds like it’s for developers, but you don’t technically need to write any code. What Claude Code gives you is a chat interface that can read and write files on your computer directly, so you can instruct it in plain English. “Build me a knowledge base from these files” is all you need to say.
On security: Claude Code only touches the folder you assign it to. It can’t access your other documents, photos, or email unless you explicitly point it there. You’re giving it a sandbox, not the keys to your whole machine.
Setting up your second brain
Step 1: Create the folder
Create a new folder called ‘Second Brain’ in your Documents folder. (You can name it whatever: I toyed with ‘Pinky and the Brain’ for a while, then thought better of it.) If you’re on a Mac, sync it to iCloud so it’s backed up automatically.
Step 2: Open Claude Code and assign the folder
Open Claude Code. Click the “Add folder” icon above the chat bar and select your Second Brain folder. You’ll see the folder path appear, confirming Claude Code can now read and write within it.
Step 3: Run the setup prompt
Go to Andrej Karpathy’s GitHub gist on LLM wikis and copy the full content. Then paste the following prompt into Claude Code, with the gist content at the end:
Here is Andrej Karpathy’s LLM Wiki pattern. Please implement this as my personal knowledge base in this folder. Create the full directory structure, the CLAUDE.md schema file, the index, the log, and all templates. Use his gist as the first source to ingest.
[Paste the full gist here]
Claude Code will read the gist, build the directory structure, create the schema files and templates, and ingest Karpathy’s gist as the first source. When it’s done, you’ll have a working second brain framework ready to fill with your own content.
Markdown files and Obsidian
Claude writes your wikis and domain knowledge into markdown files, which sit locally in your Second Brain folder. Markdown files are simply plain text files, which makes it easy for AI models to directly read and edit them. (Compared to say, a .docx or .pdf file which need to be converted first before they can be read by AI)
A second advantage of having your second brain in markdown files is that they’re portable. Most note-taking and AI apps lock you in – all your context lives in their system. But markdown files don’t. If you want to switch to Gemini or ChatGPT tomorrow, you just upload your files as context, and pick up right where you left off.
However, I was initially skeptical about having hundreds of separate files as my second brain. It felt messier than keeping everything in a single app like Notion or Evernote.
That’s where Obsidian comes in. It’s a free app that displays all your markdown files in a single clean interface: think of it as a window into your Second Brain folder. Your files stay on your drive; Obsidian just gives you a readable view of them.
To set it up, download Obsidian, open it, tap “Create new Vault,” and point it to your Second Brain folder. Your full folder structure will appear in the left-hand panel, with all your wikis readable and navigable from there.
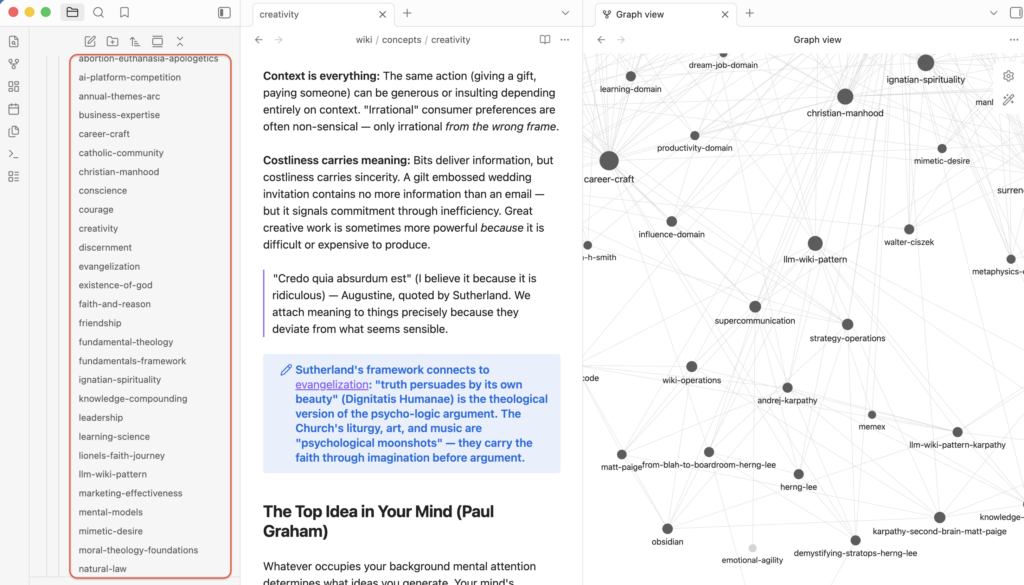
Obsidian has plenty of more advanced features (e.g.graph views, backlinks, plugins) but none of them are needed to start.
Populating your second brain
Once Claude has built your directory structure, you’re ready to fill it.
Starting from scratch: Drop any content – a PDF, a saved article, a document – into your raw/ folder, then go to Claude Code and tell it to ingest the folder. It reads what’s there, extracts the key concepts, and starts building wiki pages. Repeat whenever you add something new.
With existing notes: You can seed the system with everything you’ve already accumulated. My notes were in Apple Notes (I personally moved from Evernote –> Apple Notes a few months ago), so I used a free Mac app called Exporter to convert them into markdown files and dropped them into raw/. Most other apps like Evernote and Notion have markdown export options built in, although Evernote’s export isn’t great.
Before dumping everything in, it’s worth skipping notes that have no place in a knowledge base: grocery lists, admin reminders, one-off logistical notes. Each file costs a small amount in AI tokens, and notes like “business trip expenses” won’t improve your wikis. If sorting through your notes feels too tedious, you can ask Claude to do a quick parse to separate the admin notes with this prompt:
“Go through the files in raw/. Move anything that looks purely administrative like grocery lists, reminders, or one-off logistical note into a folder called ‘archive’ so it doesn’t get processed into my second brain.”
Claude will sort through them and you can review the decisions before running the full ingest.
That’s it!
Setting up Claude Code and Obsidian took me an hour at most. Sorting through my notes and ingesting them took two days.
But once you build yours, the experience is pretty magical.
Questions on the setup? Leave a comment or reply to the newsletter. The next post covers my capture pipeline: How I keep my second brain growing automatically with new content.
Discover more from cheerful.egg
Subscribe to get the latest posts sent to your email.